In my last post, I wrote about getting started with android studio which includes downloading and installing Android Studio. Now, its time to move forward and learn how to build your first android application or how android studio works. You can’t learn any software or language without practicing it. So, stop wasting your time on learning the theory for android development and move towards building your first application.
After installing android studio, you will see an android studio Welcome Screen.

Click on “Start New Project” from window above. You will see a window like:
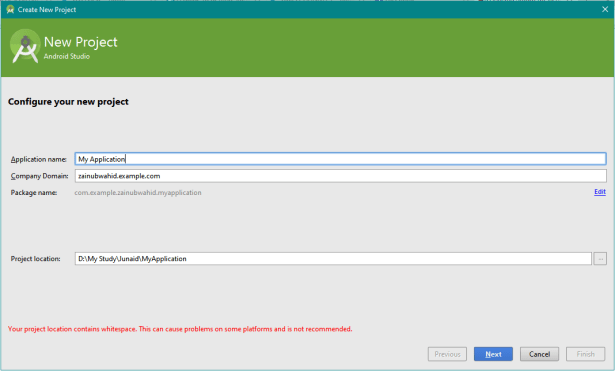
Application Name: Write any Name you want to give to your Application.
Company name: When you upload your project on google store, all your applications are recognized by your company name. Company name should be something like “Name.example.com” as in my application, I choose “zainubwahid.example.com”
Package Name: After company name, your application on google store is specifically recognized by Package name. Because whenever you update your application, package name is used to recognize your application in devices.
Project location: The location, where you want to save your project.
Then click Next.
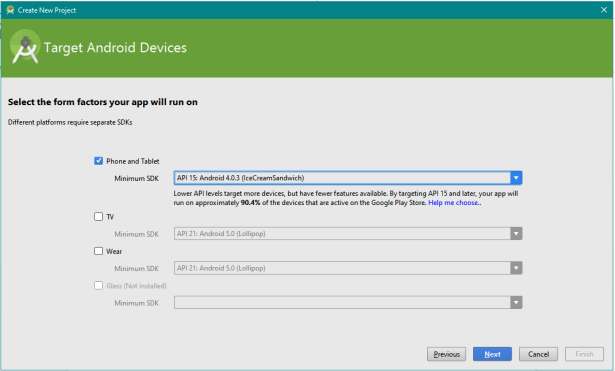
Select the platform for which you want to make an application. For example, in my case I selected Phone and Tablet. Then select the Minimum SDK. Minimum SDK means the minimum version of phone or tablet which can install your application. As I selected API 15(IceCream Sandwich).
Click “Next”.
Next step is selected activity for your application.

There are many activities available by default in android studio. Names of the activities show the functionality of activity. Here, I will recommend you selecting Blank Activity. With the passage of time, as you become familiar with android studio, you can select which activity you want. Or which activity suits your application.
Click” Next” for next step.

That is the last and most important step. Android development consists of two main important steps, I will call Front-end and Back-end. Here, front-end means layout/ presentation of your application. And back-end means back-end functionality of every screen/ activity. In simple words, you back-end is called as “Activity” and every Activity should have a layout screen called as “Layout”.
So, here in the above screen shot, write the activity name (Main activity, which will start on running your application). Write corresponding layout name (which will start and show the screen on running your application).
Title is the name of Activity you want to see on your device on starting that activity.
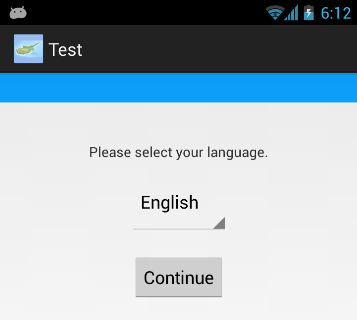
For example, in the above image, “Test” is the title of this activity.
Leave the Menu Resource Name at that time.
Best practice is to change the name and running the application again and again so that you can see the differences and you will understand it properly. Doing it only as described here will not be that much fruitful. You have to practice by changing everything and understanding the functionality.
Now click finish.
Be patient. Don’t rush. After clicking on finish, it will take some time to build your application.

After that, your first application is build and now you can edit it and write your code as you want.
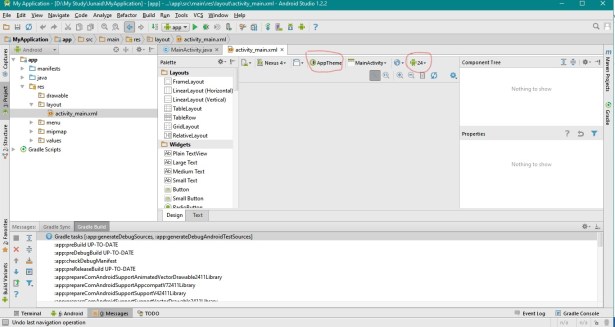
Right now, it is not showing any layout. Sometimes “rendering Problem” may occur. And this is caused by SDKs. You can see little android image with a number “24”. This is called as ‘Android Version to use when rendering layouts’. Change this from 24 to 22/23 which is suitable for your android studio. Next also change the AppTheme. Change it to HOLO Dark/ HOLO LIGHT. As these are suitable for many android studios.
You can see two windows “MainActivity.java” and “activity_main.xml”. *.java file is called as Activity and *.xml is called as Layout.

Before changing any code, I will recommend you to run your app. For running, click on the green Play button in above tools named as “Run App”. Now wait and let your application build gradle and installing all required SDKs. It may take long time. Sometimes, depending on your processor, it can take even an hour to build the gradle for the first time.
After successful build, you will see a window:
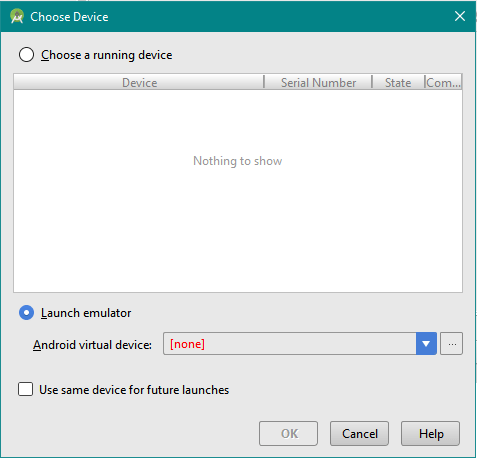
This means, you app is successfully build and it has no error and is ready for launch. Now there are two methods to view your application before finalizing. One is “Choose a running device” and second is “Launch Emulator”.
Choose a Running Device: this means you can connect your android phone with laptop and android studio will detect it. ADB Driver installed in your PC will do this for you. It will detect your device and automatically installs your application on your android device. You will see your android device’s name in above window. Then Select your device’s name and Click OK.
Launch Emulator: Emulator is virtual Android device, build by android studio and run your app in it.
Before launching emulator, make sure you have installed all the required SDKs.
I will recommend choose a running device option. Because, Emulator may take a lot of time. And will hang your PC as it requires minimum 3GB RAM. For Emulator, you have to build your own virtual device. You can do this by going to AVD Manager Window. AVD means “Android Virtual Device”.
And your Android studio is installed successfully and ready for building your own Application.
I hope this will be helpful for a lot of people who still have any confusion! Please Comment, if you find and confusion or need any help.
Thanks!

Great post! I hope to see more posts in the future!
By the way, you can also do ADB bridge remotely over WiFi. As a new and learning Android developer, I find this very helpful since I do not need to connect my device via USB.
LikeLiked by 1 person
Thank you Nicko. Yeah you can do that via WIFI also.
LikeLike
I like the valuable info you provide in your articles. I’ll bookmark your blog and check again here frequently. I am quite certain I will learn plenty of new stuff right here! Best of luck for the next!|
LikeLiked by 1 person
Thank you so much!
LikeLike
When I initially commented I clicked the “Notify me when new comments are added” checkbox and now each time a comment is added I get several e-mails with the same comment. Is there any way you can remove people from that service? Thank you!|
LikeLiked by 1 person
I am so sorry. I will look into this and solve that bug. Thanks
LikeLike
Hello there, just became aware of your blog through Google, and found that it is really informative. I am going to watch out for brussels. I will be grateful if you continue this in future. Many people will be benefited from your writing. Cheers!|
LikeLiked by 1 person
Thank you!
LikeLike
An outstanding share! I have just forwarded this onto a colleague who has been doing a little research on this. And he in fact ordered me lunch due to the fact that I stumbled upon it for him… lol. So allow me to reword this…. Thanks for the meal!! But yeah, thanx for spending some time to talk about this subject here on your web site.|
LikeLiked by 1 person
Thank you so much!
LikeLike
Hey there! This is kind of off topic but I need some advice from an established blog. Is it tough to set up your own blog? I’m not very techincal but I can figure things out pretty quick. I’m thinking about setting up my own but I’m not sure where to begin. Do you have any ideas or suggestions? Thank you|
LikeLiked by 1 person
Yes you can. It becomes easy, if you are really interested. ping me if you need any help via “Contact me” page. Thank you
LikeLike
I’m curious to find out what blog platform you happen to be working with? I’m having some small security issues with my latest site and I’d like to find something more safeguarded. Do you have any suggestions?|
LikeLiked by 1 person
I am working with WordPress. It is good enough.
LikeLike
you’re actually a excellent webmaster. The website loading speed is amazing. It kind of feels that you are doing any distinctive trick. Moreover, The contents are masterpiece. you have done a wonderful activity in this topic!|
LikeLiked by 1 person
Hi! I know this is kinda off topic but I’d figured I’d ask. Would you be interested in exchanging links or maybe guest writing a blog post or vice-versa? My blog covers a lot of the same subjects as yours and I believe we could greatly benefit from each other. If you happen to be interested feel free to shoot me an e-mail. I look forward to hearing from you! Excellent blog by the way!|
LikeLiked by 1 person
Yes I am interested. Do send me information via “Contact” page. Thanks!
LikeLike
Your mode of explaining everything in this piece of writing is genuinely pleasant, all can simply know it, Thanks a lot.|
LikeLiked by 1 person
Like!! Really appreciate you sharing this blog post.Really thank you! Keep writing.
LikeLiked by 1 person
Hi, i feel that i noticed you visited my blog thus i came to go back the choose?.I am attempting to in finding issues to enhance my web site!I suppose its good enough to use some of your ideas!!|
LikeLiked by 1 person
Thanks for commenting. Sure!
LikeLike
Admiring the time and energy you put into your blog and detailed information you provide. It’s nice to come across a blog every once in a while that isn’t the same old rehashed material. Excellent read! I’ve saved your site and I’m adding your RSS feeds to my Google account.|
LikeLiked by 1 person
I do accept as true with all the ideas you’ve presented in your post. They are really convincing and can definitely work. Nonetheless, the posts are too brief for newbies. May you please prolong them a bit from next time? Thanks for the post.|
LikeLiked by 1 person
Thank you for commenting. and Yes I will try to write a lil bit detailed next time.
LikeLike
Fantastic web site. Lots of helpful info here. I am sending it to some pals ans also sharing in delicious. And of course, thank you in your effort!|
LikeLiked by 1 person
Thank you for some other informative website. The place else may just I am getting that type of information written in such an ideal manner? I’ve a project that I am just now operating on, and I have been at the glance out for such information.|
LikeLiked by 1 person
Hi every one, here every person is sharing these experience, thus it’s fastidious to read this website, and I used to pay a quick visit this webpage everyday.|
LikeLiked by 1 person
Everything typed was actually very logical. However, think about this, what if you added a little information? I am not saying your information isn’t solid., but suppose you added something to possibly grab people’s attention? I mean BLOG_TITLE is a little plain. You might glance at Yahoo’s front page and note how they write post headlines to get viewers to click. You might add a video or a related pic or two to grab people excited about what you’ve written. In my opinion, it could bring your posts a little bit more interesting.|
LikeLiked by 1 person
Thanks for your views.
LikeLike
you’re truly a just right webmaster. The website loading speed is amazing. It sort of feels that you’re doing any distinctive trick. Furthermore, The contents are masterpiece. you have done a magnificent activity in this subject!|
LikeLiked by 1 person
I savour, cause I discovered exactly what I was taking a look for. You have ended my 4 day long hunt! God Bless you man. Have a nice day. Bye|
LikeLiked by 1 person
Cheers!
LikeLike
Really happy to be here. Thanks for writing this.
LikeLike
continuously i used to read smaller articles which as well clear their motive, and that is also happening with this post which I am reading at this time.|
LikeLike
Good post. I am experiencing a few of these issues as well..|
LikeLike
Quality articles or reviews is the crucial to interest the users to pay a visit the website, that’s what this website is providing.|
LikeLike
Wow that was unusual. I just wrote an very long comment but after I clicked submit my comment didn’t appear. Grrrr… well I’m not writing all that over again. Anyways, just wanted to say great blog!|
LikeLike
I know this if off topic but I’m looking into starting my own blog and was curious what all is needed to get set up? I’m assuming having a blog like yours would cost a pretty penny? I’m not very web savvy so I’m not 100 positive. Any recommendations or advice would be greatly appreciated. Thank you|
LikeLike
Yes! Finally something about keyword1.|
LikeLike
My brother suggested I might like this web site. He was entirely right. This post actually made my day. You can not imagine simply how much time I had spent for this info! Thanks!|
LikeLike
Great post.|
LikeLike
Heya outstanding blog! Does running a blog like this require a lot of work? I’ve very little knowledge of coding but I had been hoping to start my own blog in the near future. Anyways, if you have any ideas or techniques for new blog owners please share. I know this is off topic nevertheless I simply needed to ask. Thank you!|
LikeLike
Greate article. Keep posting such kind of information on your site. Im really impressed by it.
LikeLike
Great article. I will be dealing with many of these issues as well..|
LikeLike
Asking questions are in fact good thing if you are not understanding anything entirely, but this paragraph provides pleasant understanding even.|
LikeLike
Article writing is also a fun, if you know afterward you can write or else it is complicated to write.|
LikeLike
You are so interesting! I don’t suppose I’ve truly read through something like this before. So nice to discover someone with genuine thoughts on this subject matter. Really.. many thanks for starting this up. This web site is something that’s needed on the internet, someone with a little originality!|
LikeLike
I read this piece of writing fully concerning the difference of most recent and previous technologies, it’s awesome article.|
LikeLike
It’s an remarkable post designed for all the web people; they will obtain advantage from it I am sure.|
LikeLike
Hurrah, that’s what I was searching for, what a material! existing here at this web site, thanks admin of this site.|
LikeLike
I’d like to thank you for the efforts you’ve put in writing this website. I really hope to view the same high-grade content by you in the future as well. In fact, your creative writing abilities has motivated me to get my own, personal site now ;)|
LikeLike